OpenStack trên Kubernetes với Genestack – Phần 8: Thêm một compute node
Cloud chạy được một thời gian thì sẽ có lúc cần thêm chỗ cho VM. Với Genestack, thêm compute node gồm hai phần: đưa máy vào cluster Kubernetes, rồi để OpenStack nhận nó làm hypervisor. Phần lớn được tự động hoá bằng DaemonSet, việc của người vận hành là làm đúng các bước và đúng thứ tự.
Bài này thêm openstack-compute-3 (10.0.0.129) vào lab của series.
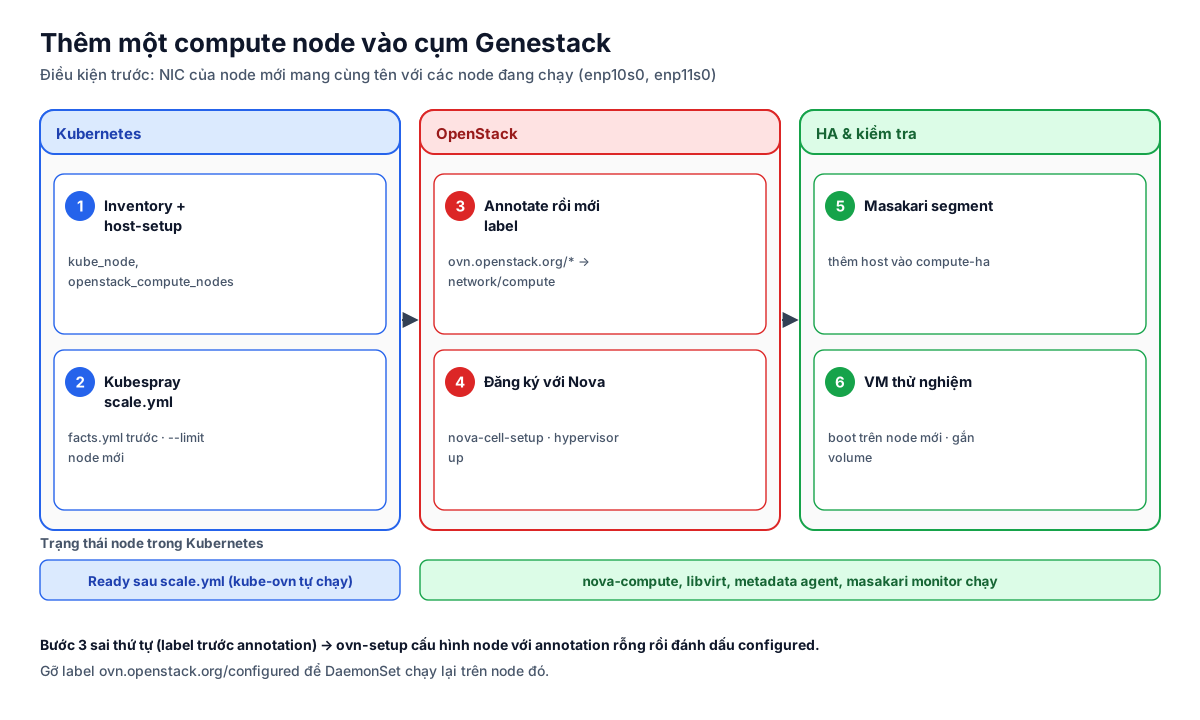
Trước khi bắt đầu: tên NIC phải giống các node đang chạy
Cấu hình mạng của Genestack gắn với tên interface, và tên này được dùng chung cho mọi node:
| Cấu hình | Giá trị trong lab | Đặt ở |
|---|---|---|
| Interface tunnel của kube-ovn | IFACE: enp10s0 | /etc/genestack/helm-configs/kube-ovn/ – áp cho cả cluster |
| Interface provider của OVN | ovn.openstack.org/ports: br-ex:enp11s0 | Annotation trên từng node |
Các lệnh dưới đây chạy trên deployer. os là hàm gọi openstack CLI qua pod admin client (Phần 5):
1
os() { kubectl -n openstack exec -i openstack-admin-client -- openstack "$@"; }
Bước 1 – Inventory và chuẩn bị host
Thêm node vào /etc/genestack/inventory/inventory.yaml ở ba chỗ:
1
2
3
4
5
6
7
8
9
10
11
12
13
14
15
16
17
18
all:
  hosts:
    # …
    openstack-compute-3:
      ansible_host: 10.0.0.129
      ip: 10.0.0.129
      access_ip: 10.0.0.129
  children:
    k8s_cluster:
      children:
        kube_node:
          hosts:
            # …
            openstack-compute-3: null
        openstack_compute_nodes:
          hosts:
            # …
            openstack-compute-3: null
Không thêm compute vào kube_control_plane hay etcd. Nhóm openstack_compute_nodes có enable_iscsi: true, để host-setup.yml cài iSCSI initiator, cần khi gắn Cinder volume (Phần 6).
1
2
3
source /opt/genestack/scripts/genestack.rc
cd /opt/genestack/ansible/playbooks
ansible-playbook host-setup.yml --limit openstack-compute-3
Lưu ý với release gần đây: role host_setup có thêm task tenant_egress_snat dành cho lab hyperconverged (hcl-builder) của Rackspace. Task này bật mặc định (lab_tenant_egress_snat_enabled: true), tạo systemd unit genestack-tenant-snat với NIC gắn cứng là enp4s0. Trên môi trường khác, nó dừng playbook với lỗi:
1
2
3
TASK [host_setup : Reload systemd and (re)start genestack-tenant-snat]
fatal: [openstack-compute-3]: FAILED! => {"msg": "Unable to start service genestack-tenant-snat.service ..."}
# journalctl -u genestack-tenant-snat: Cannot find device "enp4s0"
Nếu không dùng mô hình hcl-builder, tắt task này trong /etc/genestack/inventory/group_vars/all/all.yml:
1
lab_tenant_egress_snat_enabled: false
Rồi chạy lại host-setup.yml. Khi biến này là false, role tự dừng và gỡ unit genestack-tenant-snat. Trên node đã bị lỗi, xoá luôn trạng thái failed còn sót: systemctl reset-failed genestack-tenant-snat.service.
Bước 2 – Đưa node vào Kubernetes với scale.yml
scale.yml của Kubespray thêm node mà không đụng tới control plane. Khi chạy với --limit, Kubespray cần facts của mọi node, nên chạy facts.yml trước:
1
2
3
cd /opt/genestack/submodules/kubespray
ansible-playbook -i /etc/genestack/inventory/inventory.yaml playbooks/facts.yml --become
ansible-playbook -i /etc/genestack/inventory/inventory.yaml scale.yml --become --limit openstack-compute-3
Các DaemonSet hệ thống tự chạy lên node mới (kube-proxy, nodelocaldns, ovs-ovn, kube-ovn-cni, nginx-proxy), và node chuyển sang Ready. Gắn thêm label datapath mà các node khác đang có:
1
2
kubectl label node openstack-compute-3 ovn.kubernetes.io/ovs_dp_type=kernel
kubectl get node openstack-compute-3 -o wide
Bước 3 – Annotation trước, label sau
Các thành phần OpenStack trên compute (nova-compute, libvirt, metadata agent, monitor của Masakari) là DaemonSet chọn node theo label. Phần mạng OVN do DaemonSet ovn-setup cấu hình: nó chạy trên node có label openstack-network-node=enabled mà chưa có label ovn.openstack.org/configured, đọc annotation đúng một lần, cấu hình OVS, rồi gắn label configured.
Vì vậy annotate trước, gắn label sau. Nếu label có trước, ovn-setup có thể chạy khi annotation còn trống.
1
2
3
4
5
6
7
8
9
N=openstack-compute-3
kubectl annotate node $N ovn.openstack.org/int_bridge='br-int'
kubectl annotate node $N ovn.openstack.org/bridges='br-ex'
kubectl annotate node $N ovn.openstack.org/ports='br-ex:enp11s0'
kubectl annotate node $N ovn.openstack.org/mappings='physnet1:br-ex'
kubectl annotate node $N ovn.openstack.org/availability_zones='az1'
kubectl annotate node $N ovn.openstack.org/gateway='enabled'

kubectl label node $N openstack-network-node=enabled openstack-compute-node=enabled
Annotation gateway tuỳ theo mô hình gateway của cluster (Phần 5). Lab bật gateway trên mọi node.
Kiểm tra:
1
2
kubectl get node $N -L ovn.openstack.org/configured        # có timestamp
kubectl -n openstack get pods -o wide --field-selector spec.nodeName=$N
Trên node mới phải có libvirt-libvirt-default, nova-compute-default, neutron-ovn-metadata-agent-default, neutron-ovn-vpn-agent-default và ba pod masakari-*-monitor, đều Running.
Nếu lỡ làm sai thứ tự: sửa annotation cho đúng, rồi gỡ label configured để ovn-setup chạy lại trên node đó:
1
kubectl label node $N ovn.openstack.org/configured-
Bước 4 – Đăng ký với Nova
nova-compute tự đăng ký với Placement khi khởi động, nhưng node còn phải được đưa vào cell thì scheduler mới đặt VM lên. CronJob nova-cell-setup làm việc này mỗi giờ. Muốn làm ngay:
1
2
3
4
5
kubectl -n openstack create job --from=cronjob/nova-cell-setup nova-cell-setup-manual-$(date +%s)

os compute service list --service nova-compute    # openstack-compute-3: enabled, up
os hypervisor list                                 # openstack-compute-3: up
os network agent list --host openstack-compute-3   # OVN Controller Gateway agent + Metadata agent
Bước 5 – Thêm vào segment của Masakari
Monitor của Masakari đã tự chạy trên node mới, nhưng Masakari chỉ xử lý host nằm trong segment (Phần 7):
1
2
os segment host create openstack-compute-3 COMPUTE SSH compute-ha
os segment host list compute-ha
Bước 6 – VM thử nghiệm trên node mới
Với quyền admin, ép VM chạy trên node mới bằng cú pháp availability-zone:host, rồi gắn một volume để kiểm tra đường iSCSI:
1
2
3
4
5
6
7
os server create test-vm-c3 --flavor m1.tiny --image "Cirros 0.6.2 64-bit" \
  --network test-net --availability-zone az1:openstack-compute-3 --wait
os server show test-vm-c3 -c status -c OS-EXT-SRV-ATTR:host
os console log show test-vm-c3 | tail -5

os volume create test-vol-c3 --size 1 --type lvm-ssd
os server add volume test-vm-c3 test-vol-c3
Trên node mới, iscsiadm -m session phải có session tới storage node chứa volume. Gắn floating IP và ping thử để kiểm tra luôn đường ra mạng provider qua enp11s0.
Dọn dẹp:
1
2
3
os server remove volume test-vm-c3 test-vol-c3
os server delete --wait test-vm-c3
os volume delete test-vol-c3
Checklist
| Bước | Kiểm tra | Mong đợi |
|---|---|---|
| Trước khi bắt đầu | ip -br addr, ip route trên node | enp10s0 có IP overlay, enp11s0 không IP, một default route |
| 1 | systemctl is-active iscsid trên node | active |
| 2 | kubectl get node openstack-compute-3 | Ready |
| 3 | Label ovn.openstack.org/configured | Có timestamp |
| 3 | Pod trên node | libvirt, nova-compute, metadata agent, masakari monitor Running |
| 4 | os hypervisor list | openstack-compute-3 up |
| 5 | os segment host list compute-ha | Có openstack-compute-3 |
| 6 | VM thử nghiệm | ACTIVE trên node mới, gắn volume được |
Tóm tắt
- Điều kiện trước: NIC của node mới mang cùng tên với các node đang chạy, hoặc khai báo riêng
IFACEvà annotationportscho nó. - Kubernetes: inventory →
host-setup.yml→facts.yml→scale.yml --limit. kube-ovn tự chạy lên. - OpenStack: annotate trước, label sau, rồi đưa node vào cell bằng
nova-cell-setup. - Thêm node vào segment của Masakari, và kiểm tra bằng một VM ép chạy trên node mới, có gắn volume.